Thursday, May 21, 2020

,
A chair planter makeover!

Can you believe I got this chair planter out of the burn pile?!

Of course, it didn't look so great when I got it.

The thing about chair planters is that they're exposed to the elements, so they fall apart rather quickly.  

I've had to repair a couple chair planters this year after a windy day sent them across the yard at a rapid pace!

As for this chair planter, I got it from my mom.  She had several chairs that had seen better days, so to the burn pile they went.  

I saw some potential in this planter chair, so I dug it out of the pile & got to work on restoring it!

Wednesday, May 20, 2020

,

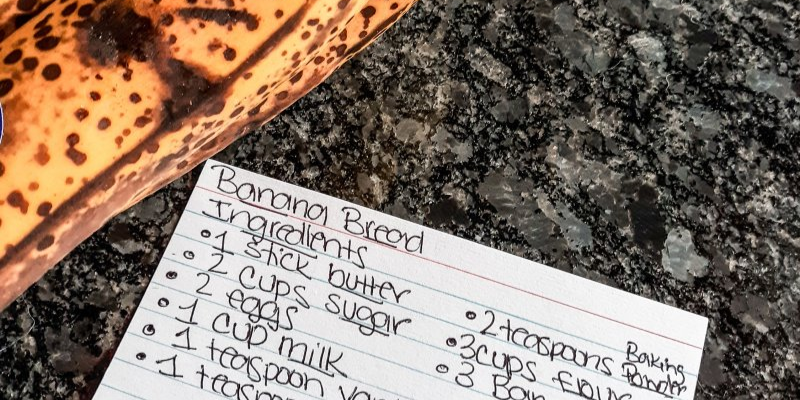
Image of homemade banana bread loaves fresh from the oven, showcasing a golden-brown crust and a moist, fluffy texture, set against the cozy backdrop of Tiff's kitchen. | on the creek blog // www.onthecreekblog.com

Hey Besties! 🌟 Guess what? I've stumbled upon the holy grail of banana bread recipes, and I've been obsessed for months! 🍞✨


A few days back, I found myself with a bunch of super-ripe bananas (you know, the perfect banana bread kind!). So, what did I do? I whipped up not one but several loaves of this heavenly bread!

Here's a funny twist: the original recipe was just a screenshot on my tablet, with no website or author's name. Wanting to give a shout-out to the genius behind this yumminess, I turned into a detective on Google. 🕵️‍♀️ Believe me, finding this needle in the haystack of a million banana bread recipes was no small feat!


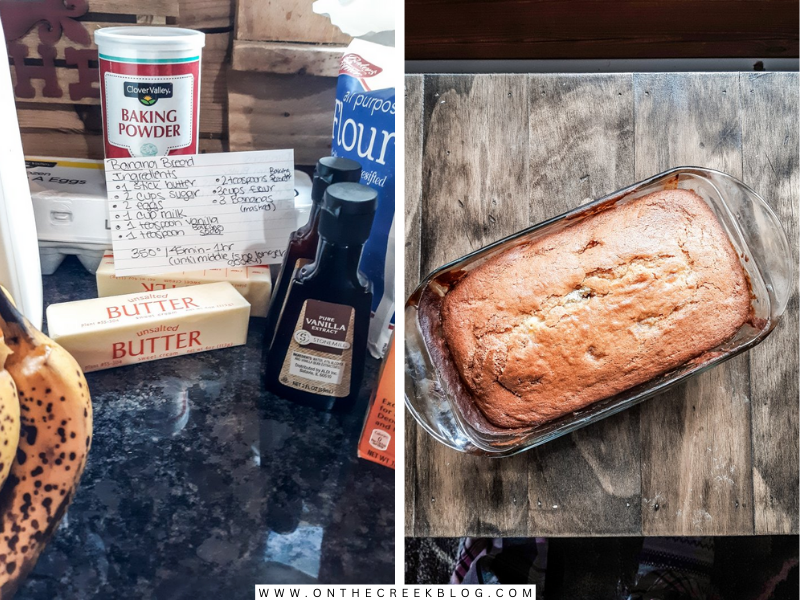
I'm such a repeat offender with this recipe that I finally wrote it down. No more squinting at a flour-smudged tablet screen for me! 📱💁‍♀️

Image of homemade banana bread loaves fresh from the oven, showcasing a golden-brown crust and a moist, fluffy texture, set against the cozy backdrop of Tiff's kitchen. | on the creek blog // www.onthecreekblog.com


The other day, I decided to double the recipe while in my baking frenzy. Picture this: my KitchenAid mixer practically doing acrobatics to mix all those bananas! 🍌🎪 A word of advice? Stick to single batches, folks!


I usually jazz up my banana bread with walnuts and chocolate chips. But, surprise! I was out of walnuts and didn't dare overload my already overworked mixer. So, I went old school and baked it plain. And guess what? It was a smash hit, even without the frills! 🎉


I made so much I thought I'd freeze some for later. Who was I kidding? In our house, banana bread vanishes faster than a magician's rabbit! 🐰✨ It's just that delicious!

Image of homemade banana bread loaves fresh from the oven, showcasing a golden-brown crust and a moist, fluffy texture, set against the cozy backdrop of Tiff's kitchen. | on the creek blog // www.onthecreekblog.com


Want in on this banana bread magic? Head over to the blog for the recipe! It's a game-changer! 🍌🌟

[Link to the recipe]


Shop this post! As an Amazon Associate I earn from qualifying purchases.

Tuesday, May 19, 2020

,
Transplanting small, leggy tomaotes into larger containers | On The Creek Blog
Transplanting tomatoes into larger cups!

Over the weekend, we transplanted our tomatoes into cups!

As I said in my seedling update post, my tomatoes were getting super leggy. They needed transplanted ASAP!  I wasn't quite ready to put them in the garden just yet, so we transplanted them into bigger containers.

This proved to be an enormous task!

My husband & I worked for HOURS getting these little tomatoes transplanted! 

It was quite the task but I'm so happy with the results!


Monday, May 18, 2020

,
Roma VF Seedlings | on the creek blog // www.onthecreekblog.com


Hey there, Besties! 🌟


Ever embarked on a journey of turning tiny seeds into bountiful harvests? That's exactly the adventure we dove into with our Roma VF tomatoes! 🍅✨

Roma VF Seedlings | on the creek blog // www.onthecreekblog.com

Roma VF Seedlings | on the creek blog // www.onthecreekblog.com
The Unfolding Tale of Our Roma VF Tomato Seedlings

Picture this: It was mid-April, and amidst drafting another post, I realized that I've yet to share our escapade with starting Roma VF seeds from scratch!


We planted these age-old seeds on April 15, eagerly awaiting signs of life. A week zoomed by... and nada. Zilch. I almost wrote them off, convinced they were duds, and even brainstormed a Plan B. But, lo and behold, as I spilled the beans last week, those little troopers did sprout – fashionably late, but they made their grand entrance!


During a routine Home Depot run for some pergola paraphernalia, my curiosity led me to the seed aisle. Ah, Roma tomatoes, my absolute faves! And there it was, the Roma VF variety, beckoning me to give it a whirl. 🌱

Roma VF Seedlings | on the creek blog // www.onthecreekblog.com

Roma VF Seedlings | on the creek blog // www.onthecreekblog.com


A Twist in the Tale: Planting in Cups!

This time around, I opted for a quirky yet effective method – planting the seeds in cups! Yes, you read that right. Cups, not flats. And, oh boy, what a game-changer! Equipped with a nifty seed dropper (another Home Depot find), the tedious task of planting those teeny-tiny tomato seeds became a breeze.


Fast forward, and we've got 30 cups, each hosting a duo of these precious seeds. Peek at the snapshots in this post to see our little green babies in their initial glory. And here they are now, a tad smaller than their siblings but growing with gusto! 🌿


Notice the leggy growth? No worries – a little more soil will fix them right up. Though, I might need to play the tough love card and thin them out a bit – they're getting a bit cozy in there!

Roma VF Seedlings | on the creek blog // www.onthecreekblog.com

A Verdant Conclusion

Between our late bloomers and the new Roma VF recruits, it's safe to say our garden will be teeming with tomato plants. I'm crossing my fingers that they all thrive and survive!


So, there you have it, my earthy adventure with Roma VF tomatoes. 


Much like life, Gardening is filled with surprises, lessons, and, most importantly, growth. Here's to nurturing our green thumbs and souls, one seedling at a time! 🌍✨🍅


Stay green and gleeful,

Tiff


1 | 2 | 3 | 4


Friday, May 15, 2020

,
White lilac // spring yard walk | On The Creek Blog
Come with me as I look over the various plants in our yard & see how they're doing after the winter!

It's time for my annual spring yard walk!

Come along with me as we tour my yard & see how the perennial plants are doing this spring!

This spring has been weird.  There were a couple late frosts & overall, everything was super late coming over here.

I've said this in my last yard walk, but I'm certain everything comes up just a little bit slower over here.  My lilacs haven't even flowered yet!

Here are the plants & how they're doing this year:


Thursday, May 14, 2020

,
Leggy tomato seedlings | On The Creek Blog
An update on our seedling adventure!

I'm back with a seedling update!

Our various tomato seedlings have been growing for about a month now.

Most of the old seeds we planted actually came up!  I was so excited to see the different varieties coming up!  Some varieties definitely did better than others, but everything produced at least a few seedlings!

But, here's the bad news...

The tomato seedlings are super leggy!


Wednesday, May 13, 2020

,
gardentitleBreaking ground in our new garden area!

We tilled our new garden area last week!

But, first, a little garden backstory:

For the past 2 years, we’ve used our railroad tie raised garden bed.

That raised bed was kind of a garden disaster. 

We put plastic in the bottom as a weed barrier & I’m almost certain it fried our plants the first year. 

Last year was more promising, but I don’t think the soil was quite right.  The plants did better, but they were nothing compared to the very first year we had a garden.

This year, I decided to go back to the basics.

Tuesday, May 12, 2020

,
breadtitleI made the famous Reddit Peanut Butter Bread!

I enjoy browsing Reddit & love finding new subreddits to look through.

One of my latest finds has been the Old_Recipes subreddit.

When I first started looking at the subreddit, I kept seeing the same recipe made by different users over & over:

Peanut Butter Bread.

It looked easy enough to make so I thought I’d try it.

Here are my thoughts:


Monday, May 11, 2020

,
A free primitive table gets a cute & updated makeover! | On The Creek BlogA primitive table gets a cute & updated makeover!

We completed this project last year, but I’m just getting around to posting it today!

I actually gave this table a little refresh over the weekend which inspired me to share it!

The table is far from perfect, but I love the primitive vibes it has!

I’m all about trash to treasure makeovers & this table is a true reflection of that!

Can you believe we picked this table up for free in front of someone’s house?!  We were driving by & saw this falling apart table with a ‘free’ sign next to it & immediately turned around to take a look!

The table was in rough shape, but it was free so I wasn’t afraid to take a chance on it.


Friday, May 08, 2020

,
peartitleBeautiful to pear blossoms!

I’ve shared some pictures of my parents’ pear tree in the past.  I thought I’d take you along this year from the beginning:  the blossoms!

The pear tree always does extremely well & produces a ton of pears, but it has really shown up this year!

There are blossoms everywhere!

This is a Bartlett pear tree & full pears should be ready by the end of August or early September.

When it’s harvest time, there will be plenty of pears to eat & make things from!  I’ve gathered some recipes that would be perfect for these Bartlett pears!


Tuesday, May 05, 2020

,
Building a small DIY pergola | On The Creek Blog
We built a (small) pergola!

This was one of those projects that I’ve been wanting to do forever & it finally happened!

Last year, we acquired some old posts & they just sat outside in the yard, waiting for something to be done with them.  Because of bugs, I didn’t want to bring them into the house, so an outdoor eyesore they became!

One day, I decided that they would make a good pergola.  There was a spot in our yard between our water well & our lilac tree that I thought would be perfect for a pergola.  I also hated mowing that tiny area so I wanted to get rid of it!

Finally, after months & months of wanting to build it, we finally did it! 

Monday, May 04, 2020

,
Step-by-step transformation of an upcycled dining bench, showcasing the process from applying crackle glaze to the final custom-stained piece. | on the creek blog // www.onthecreekblog.com

Hey, Besties! 

Guess what? I'm back with a fab update on our DIY upcycled dining bench

The Bench's First Fitting 

Before diving into the paint pots, we took the bench upstairs for a little fitting session with our dining table. Oops! The legs were sky-high! A quick trim and some sanding later, they were runway ready.
Step-by-step transformation of an upcycled dining bench, showcasing the process from applying crackle glaze to the final custom-stained piece. | on the creek blog // www.onthecreekblog.com

The Color Palette 

Inspired by Charlotte's post on aging cabinet legs, I gave our bench a vintage vibe. I reached for my go-to Project Perfect paint, which I snagged on clearance. It's the only brown paint I own, but it's a gem! It gave the bench frame a uniform, rich hue. 
Step-by-step transformation of an upcycled dining bench, showcasing the process from applying crackle glaze to the final custom-stained piece. | on the creek blog // www.onthecreekblog.com


Crackle, Pop, Wow! 

Next up was the crackle glaze, a first for me! It's like applying invisible ink—you can't see it, but you know it's there. I slathered it on and waited for the magic to happen. And voila! The crackle effect was born. 

Antique or Not? 

I then experimented with antiquing glaze, and let's say it was a learning curve. It went from "vintage chic" to "dungeon grim" real quick. Hubby stepped in to finish the application while I played damage control with a light coat of white paint. Crisis averted! 
Step-by-step transformation of an upcycled dining bench, showcasing the process from applying crackle glaze to the final custom-stained piece. | on the creek blog // www.onthecreekblog.com

The Grand Finale 

Finally, it was time to crown our bench with its top. I roughed up the seat pieces for an aged look before staining them with a custom mix of Special Walnut and Jacobean. A few coats of sealer later, and our bench was ready for its close-up! 
Step-by-step transformation of an upcycled dining bench, showcasing the process from applying crackle glaze to the final custom-stained piece. | on the creek blog // www.onthecreekblog.com

Step-by-step transformation of an upcycled dining bench, showcasing the process from applying crackle glaze to the final custom-stained piece. | on the creek blog // www.onthecreekblog.com


The Final Reveal 

I'm head over heels for how it turned out! It's a blend of old and new, chippy yet chic, and it's hands-down my favorite furniture piece to date. 

Final Thoughts

Sending you all the creative vibes! If you're feeling inspired, why not try upcycling a piece of furniture? Share your projects with me by tagging @OnTheCreekBlog on social media. I can't wait to see your creations! 🎨👀

Shop this post! As an Amazon Associate, I earn from qualifying purchases. 

On the Creek blog is proud to be a part of the T&J Maintenance family - turning houses into homes.