Showing posts with label furniture makeover. Show all posts

Wednesday, June 08, 2022

,
A cute side table makeover using Fusion Mineral Paint | On The Creek Blog // www.onthecreekblog.com

A small side table gets a super easy & cute makeover!

This is my first furniture project of the year.  It's weird, but it's difficult for me to work on furniture without James being here.  Refurbishing furniture was our thing--James would repair the absolute trash furniture I brought home & then I painted everything.  

There's still a rocking horse in the basement that James repaired before things got crazy.  I know I need to paint it, but I can't bring myself to start on it.

I randomly found a small side/end table at Goodwill last week & decided to bring it home.  It just needed to be painted, so it was a relatively easy project.  I'm sure if James were here, he would have made some repairs.  It's a little wobbly & James was all about perfection when it came to anything like that.  He would have had it as good as new in no time.  Now I just have to be comfortable with the imperfections.

I dug out my favorite Fusion Mineral Paint color, Sacred Sage & got started.  The finish was a little shiny, so I sanded it down just a little bit with my sanding sponge.  I got lazy & didn't sand the entire thing, but the paint went on beautifully.  I love Fusion Mineral Paint so much.  It's very forgiving.  My favorite part is that it has a built-in topcoat.  I've had some major topcoat disasters with bleed through & I've never had it with Fusion so far.

Wednesday, July 22, 2020

,

Farmhouse-style end table makeover | on the creek blog // www.onthecreekblog.com

Hey there, Besties! 🌟


You might recall the magic I worked on an old dining bench, right? Well, guess what? I had its twin - a charming end table - waiting for its moment of transformation. I initially toyed with the idea of creating another bench, but this time, I craved a simpler project. And so, the journey of giving this end table a farmhouse-style makeover began!

Farmhouse-style end table makeover | on the creek blog // www.onthecreekblog.com

The Adventure Begins: Prepping the End Table

The makeover kicked off with this endearing end table. Oh, those legs! They had a charm that tugged at my heartstrings. Cutting them down for our bench project was a tough call but necessary.


I tried detaching the top before painting, but it was a stubborn little thing! So, painting first, it was, and later, with some help from my dear husband, we managed to remove the top.


Farmhouse-style end table makeover | on the creek blog // www.onthecreekblog.com
The Magic of Crackle Paint: Achieving a Distressed Farmhouse Look

I'm no stranger to crackle paint, having used it on several pieces (like our dining benchchair planter, and solar chandelier). This time was no different. The process started with a dark brown base coat, mimicking a rich, dark stain. Next came the crackle layer. And finally, the top coat was applied when the crackle was just tacky enough. The result? A beautifully distressed finish that screams farmhouse chic!

Farmhouse-style end table makeover | on the creek blog // www.onthecreekblog.com

Crafting the Perfect Top: A Journey to Home Depot

The original top was far from perfect - not solid wood and riddled with imperfections. So, off to Home Depot, we went in search of the perfect board to craft a new top. The process was surprisingly straightforward - one board, a few cuts, and voilà! We opted for nails to secure the boards, adding to the antique feel of the piece.

Farmhouse-style end table makeover | on the creek blog // www.onthecreekblog.com


Sanding and Distressing: Giving Life to New Wood

Our trusty miter saw is a bit dull and didn't leave the cleanest of cuts. So, sanding was essential to smooth out the rough edges and unify the look. But the fun didn't stop there!


We unleashed our creativity with a chain and hammer to age the new boards, diligently working to distress the wood. The goal was to give it a seasoned, lived-in look, and we nailed it!


Staining and Sealing: The Finishing Touches

I mixed Jacobean and Special Walnut for the stain to create a custom shade. It was the perfect blend to complement the crackled base. After applying several coats of polyurethane, our end table was not just transformed but reborn.

Farmhouse-style end table makeover | on the creek blog // www.onthecreekblog.com

Farmhouse-style end table makeover | on the creek blog // www.onthecreekblog.com


The Thrill of the Sale: A Surprising Outcome

With the end table complete, curiosity got the best of me, and I listed it on Facebook Marketplace. Selling pieces always gives me butterflies - will others love them as much as I do? To my delight, the table found a new home within an hour! 🌟

Farmhouse-style end table makeover | on the creek blog // www.onthecreekblog.com


What's Next? More Projects, More Stories

This quick sale has sparked a fire in me. Our basement is brimming with furniture, begging for a second chance. I'm more excited than ever to roll up my sleeves and dive into these projects. And you know what? I'm bringing you along for every step, every brushstroke, and every joyful discovery.


Stay tuned, Besties, for more tales of transformation and creativity. It's not just furniture we're reviving; it's the spirit of making a house a home. 🛠️🌱


Monday, May 11, 2020

,
A free primitive table gets a cute & updated makeover! | On The Creek BlogA primitive table gets a cute & updated makeover!

We completed this project last year, but I’m just getting around to posting it today!

I actually gave this table a little refresh over the weekend which inspired me to share it!

The table is far from perfect, but I love the primitive vibes it has!

I’m all about trash to treasure makeovers & this table is a true reflection of that!

Can you believe we picked this table up for free in front of someone’s house?!  We were driving by & saw this falling apart table with a ‘free’ sign next to it & immediately turned around to take a look!

The table was in rough shape, but it was free so I wasn’t afraid to take a chance on it.


Monday, April 27, 2020

,
A church pew gets a dark & chippy makeover | On The Creek Blog
A super cute church pew gets a dark & chippy makeover!

I can’t believe I’ve never shared my church pew here on the blog!  I got this pew at the Salvation Army Family Store last year.  I love it because it’s super small & cute!  It’s also really light so it’s easy to move around!

I actually had this pew in my entryway for a little while when I first got it.  Then we started making bed benches & they took its place, but it’s back…for now!


Tuesday, March 24, 2020

,

Transformed vintage rocking horse with a fresh coat of paint and a newly stained seat, perfect for home decor or a child's playtime. | on the creek blog // www.onthecreekblog.com


Hey, Besties!

Guess what? I have a heartwarming tale of a little rocking horse that got a fabulous makeover! My lovely aunt gifted me this charming rocking horse, gracing her front porch for years. I was already smitten with its cuteness, but you know me—I couldn't resist giving it a little TLC!

Transformed vintage rocking horse with a fresh coat of paint and a newly stained seat, perfect for home decor or a child's playtime. | on the creek blog // www.onthecreekblog.com

Transformed vintage rocking horse with a fresh coat of paint and a newly stained seat, perfect for home decor or a child's playtime. | on the creek blog // www.onthecreekblog.com

The Prep Work 

First, I used a paint stripper to remove the chipping paint. After letting it work its magic, my husband and I teamed up to sand down the horse, aiming for a smooth, flat surface to welcome its new finish like a warm hug.


A Seat with a View

Amid our sanding session, my hubby had a lightbulb moment. The existing seat was on the thin side, so he crafted a new, slightly larger one from a board we had lying around. I stained the seat, embracing my newfound love for mixing painted and stained pieces. It adds so much character.


Time for a Paint Party 

With the horse sanded to near perfection, it was time to bring out the paint! I opted for one of my all-time favorite colors, a warm white that I've used on everything from my coffee station cabinet to random knick-knacks. A few coats later, and voila!


Transformed vintage rocking horse with a fresh coat of paint and a newly stained seat, perfect for home decor or a child's playtime. | on the creek blog // www.onthecreekblog.com
The Final Reveal 

The rocking horse is now not just a display piece but a treasure filled with character and love. And guess what? If we ever have a younger foster placement, it's ready for some real rocking action!

Swipe through the pics to see the transformation! 


Transformed vintage rocking horse with a fresh coat of paint and a newly stained seat, perfect for home decor or a child's playtime. | on the creek blog // www.onthecreekblog.com
Ready to Gallop into Your Next DIY Adventure? 

Isn't it just the cutest? I'm head over heels for this little guy! Let me know what you think in the comments below, and if you've ever given a vintage piece a new lease on life, I'd love to hear about it!🐴✨

Transformed vintage rocking horse with a fresh coat of paint and a newly stained seat, perfect for home decor or a child's playtime. | on the creek blog // www.onthecreekblog.com

Shop this post!

As an Amazon Associate, I earn from qualifying purchases. Thank you so much for your support!


Thursday, January 09, 2020

,
Rustic and primitive wash stand makeover by Tiff, featuring a chippy white finish with imperfections, adding character and charm. | on the creek blog // www.onthecreekblog.com

Hey Besties! 🌿 So, remember that washstand in yesterday's post? Let's dive a bit deeper into its makeover journey, which, spoiler alert, turned out to be a masterclass in keeping it simple!

The Grand Vision (and Its Crack!)

Initially, my eyes were set on transforming the top of the washstand, which had this not-so-charming colossal crack. First step? My husband and I glued it back together – goodbye, gaping hole, hello, still-there-but-secure crack.


Rustic and primitive wash stand makeover by Tiff, featuring a chippy white finish with imperfections, adding character and charm. | on the creek blog // www.onthecreekblog.com
The Gel Stain Experiment

Next, I had this brilliant idea (or so I thought) to use gel stain like an art project. I had done it before and loved it, so why not again? The plan: slather it on thick, let it dry, and then layer on the topcoat. My husband and I turned this into our little basement ritual, assessing, adding more stain and more topcoat, aiming for that epoxy-esque finish.


A Bumpy Road

But oh, did it turn bumpy. Every check-in was a new discovery: smudges, uneven stain, dust specks. Layer after layer, it was like we were stuck in a never-ending loop of 'just one more coat'.

Rustic and primitive wash stand makeover by Tiff, featuring a chippy white finish with imperfections, adding character and charm. | on the creek blog // www.onthecreekblog.com


The Breaking Point

Patience is not my strong suit, and this project really tested it. Even my husband was feeling the frustration. It seemed like this top would forever be a work in progress.


Back to Square One

So, we called it. Time to strip it all back and start fresh. Surprisingly, scraping off our million layers of ambition was easier than expected. And guess what? Underneath it all, we found that a perfect finish was never in the cards.

Rustic and primitive wash stand makeover by Tiff, featuring a chippy white finish with imperfections, adding character and charm. | on the creek blog // www.onthecreekblog.com


Simplicity Wins

Back at the beginning, we chose the path of simplicity. A touch of gel stain to even things out, a bit of wax, and voilà. The result? Honestly, I think it looks stunning. It's got this rustic, primitive charm, with the imperfections adding character rather than taking away.

Sometimes, it's not about the pursuit of perfection but rather about embracing the beauty in the flaws, cracks and all. This washstand is a testament to that, a reminder that sometimes, simplicity really is the ultimate sophistication.


Shop this post! As an Amazon Influencer, I earn from qualifying purchases.


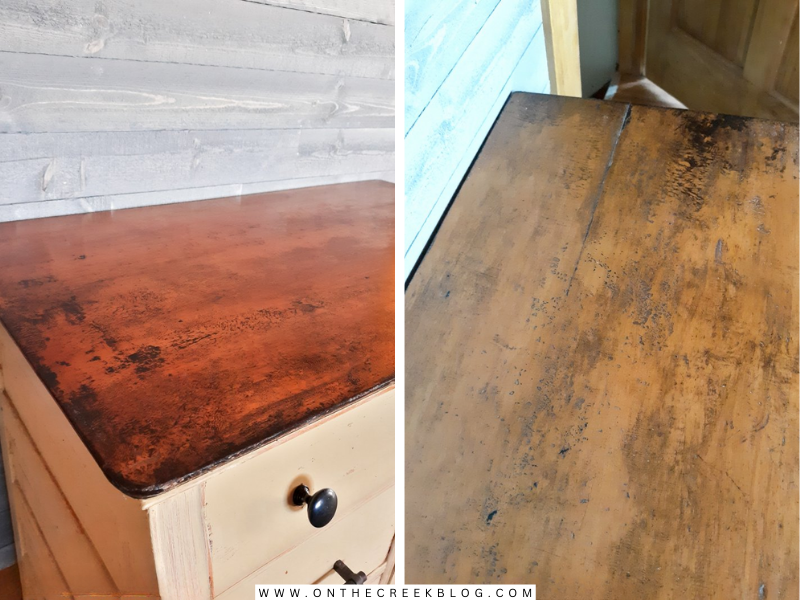
Wednesday, January 08, 2020

,
Transformed vintage wash stand painted in vibrant yellow, featuring distressed details and chic black hardware. | on the creek blog // www.onthecreekblog.com

Hey, Besties! 

Do you know that feeling when the thrift store gods smile down on you? That's exactly what happened when I stumbled upon this adorable washstand. And the best part? It's car-friendly! 


The Heartbreak of Thrift Store Finds

Let's rewind a bit. I've had my share of thrift store heartbreaks—those moments when you find the perfect piece, but it's just too big to fit in the car. Ugh, right? But not this time! 


The Decision Moment

So, there I was, waiting for another customer to decide. She was in front of the washstand, contemplating, maybe even having a mental flowchart moment (we've all been there). Finally, she walks away. My turn! 


Love at First Sight

One look at the rustic back of this piece, and I knew it was coming home with me. Sure, it had its quirks—a crack here, a missing knob there—but that makes it special. 

Transformed vintage wash stand painted in vibrant yellow, featuring distressed details and chic black hardware. | on the creek blog // www.onthecreekblog.com


The Makeover Begins 


Choosing the Perfect Hue

Time for a makeover! I was vibing with a sunny yellow, so I chose "Cork Board" by Dutch Boy. First, I tackled the drawers and the door. A little sanding, a little distressing, and voila! Rustic chic achieved.


To Top Coat or Not to Top Coat

Now, let's talk top coat—or the lack thereof. I skipped it! Why? Because I used outdoor paint, and that stuff's built to last. 


The Finishing Touches 

The finishing touch? Some hardware I had lying around. A quick spray paint session later, and those knobs were looking fab in black.


Transformed vintage wash stand painted in vibrant yellow, featuring distressed details and chic black hardware. | on the creek blog // www.onthecreekblog.com


Transformed vintage wash stand painted in vibrant yellow, featuring distressed details and chic black hardware. | on the creek blog // www.onthecreekblog.com


The Reveal 

Y'all, I'm smitten. This might be my favorite furniture flip yet!


Sending You All the Creative Vibes 

Feeling inspired? I'd love to see your own furniture transformations! Please share them with me using the hashtag #OnTheCreek, and let's spread the creative vibes together!🌿💕


Monday, November 18, 2019

,
White chipppy/distressed cabinet perfect for coffee supply storage! | On The Creek Blog
A cute cabinet gets a white chippy & distressed makeover!

Thursday, July 25, 2019

,
Outdoor chair makeover using Behr Deck Over paint in Slate! | On The Creek Blog
A cute old outdoor chair gets a painted makeover!
On the Creek blog is proud to be a part of the T&J Maintenance family - turning houses into homes.