Showing posts with label kay house reno. Show all posts

Thursday, April 04, 2019

,

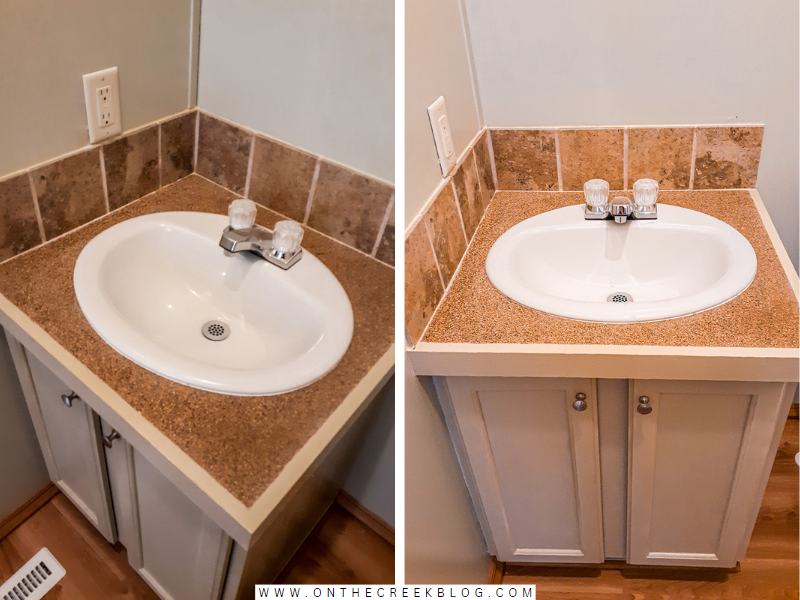
Textured spray paint countertop transformation in bathroom vanity, featuring a smooth finish achieved with triple-thick polyurethane. | on the creek blog // www.onthecreekblog.com

Hey, Besties!

If you've been following our journey at the Kay House Reno, you know we've had to get creative with some of our design choices. Today, I'm diving into a project that turned a plain, builder-grade bathroom vanity into a statement piece: textured spray paint countertops!


The Challenge: A Basic Bathroom Vanity

We had to keep the existing bathroom vanity for reasons I'll delve into in a future post. While it was in good shape, it lacked that "wow" factor I crave in my designs. It was time for an upgrade!


Textured spray paint countertop transformation in bathroom vanity, featuring a smooth finish achieved with triple-thick polyurethane. | on the creek blog // www.onthecreekblog.com

Textured spray paint countertop transformation in bathroom vanity, featuring a smooth finish achieved with triple-thick polyurethane. | on the creek blog // www.onthecreekblog.com


The Inspiration: A Pinterest Discovery

As someone constantly scrolling through Pinterest for inspiration, I stumbled upon a pin about textured spray-painted countertops. Intrigued, I clicked over and discovered a whole new world of possibilities. But the question remained: would this work in real life?


The Experiment: A Small Vanity Makeover

I decided to test this out on our small vanity. Its compact size made it the perfect candidate for a trial run. Here's how we transformed it:


Step 1: Surface Preparation

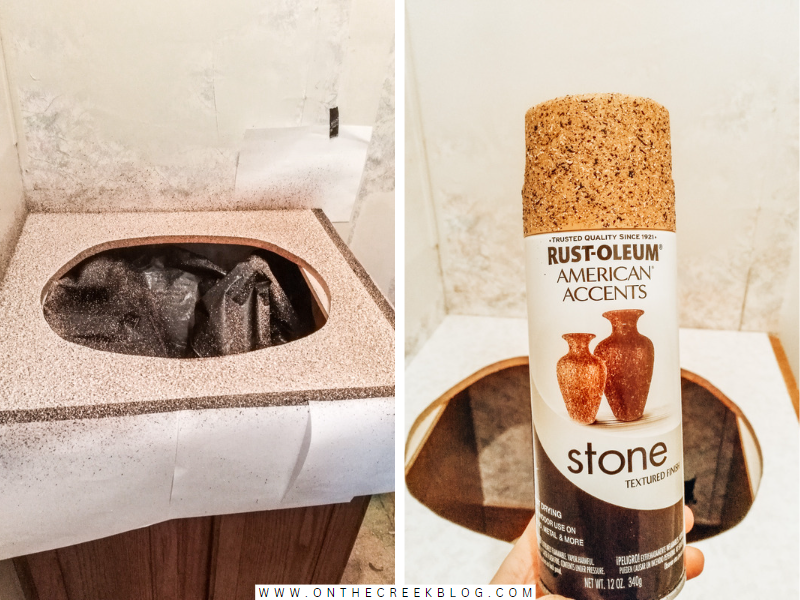
  • What We Did: Removed the sink and lightly sanded the laminate surface. Wiped it clean to ensure a smooth painting process.


Step 2: Area Preparation

  • What We Did: Taped paper around the edges and covered the sink with thick plastic to prevent spray paint splatter.


Step 3: The Painting Process

  • What We Used: Rust-Oleum American Accents® Stone Spray Paint
  • What We Did: Applied several light coats, building up the texture. Patience is critical here; let each coat dry before applying the next.


Step 4: The Finishing Touch

  • What We Used: Triple-thick polyurethane
  • What We Did: Applied several coats until the surface was smooth. For a more durable finish, consider investing in a heavier top coat.


The Verdict: A High-End Look for Less!

I couldn't be happier with the results! The textured spray paint gave the countertop a luxurious feel without breaking the bank. In fact, I loved it so much that we applied the same technique to our master bath vanity!

Textured spray paint countertop transformation in bathroom vanity, featuring a smooth finish achieved with triple-thick polyurethane. | on the creek blog // www.onthecreekblog.com

Textured spray paint countertop transformation in bathroom vanity, featuring a smooth finish achieved with triple-thick polyurethane. | on the creek blog // www.onthecreekblog.com

Final Thoughts

This project proves that you can transform even the most basic elements in your home with some creativity and elbow grease. Stay tuned for more Kay House Reno updates and DIY adventures!

Textured spray paint countertop transformation in bathroom vanity, featuring a smooth finish achieved with triple-thick polyurethane. | on the creek blog // www.onthecreekblog.com
Shop this post! As an Amazon Influencer, I earn from qualifying purchases. As always, thank you so much for supporting my blog.

Tuesday, February 05, 2019

,


How to remove a mirror glued to the wall | On The Creek Blog // www.onthecreekblog.com

How to remove a mirror that is glued to the wall.

Removing a mirror glued to the wall can seem like a daunting project, but it’s actually super easy to do!  Read more to find out how we removed the mirror in the bathroom of our renovation!

One of the bathrooms in the Kay House Renovation had a mirror that was glued to the wall.  The thing was, the mirror itself wasn't in bad shape.

The problem was that the mirror had a weird little design on top.  It was definitely straight out of the 1980's!  In an effort to bring the house up to date, I knew the mirror had to go!

But, of course, taking the mirror off the wall wouldn't be an easy thing to accomplish.  The thing was glued to the wall!   Honestly, though, I think that’s the only way you can put on those type of mirrors.  Like, Liquid Nails forever & stick it up there.

So how were we going to remove it?


Tuesday, January 22, 2019

,
'Before' pics of one of the bathrooms in our Kay House Reno!
Check out the ‘before’ pics of one of the bathrooms in the Kay House Reno!

Wednesday, January 16, 2019

,
Our next renovation projects!
I’m finally sharing some new projects I’ve been working on! 
On the Creek blog is proud to be a part of the T&J Maintenance family - turning houses into homes.