Showing posts with label tutorial. Show all posts

Friday, June 12, 2020

,

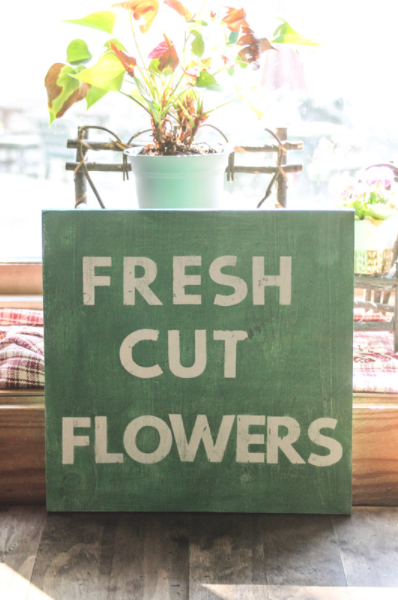
'Fresh Cut Flowers' handmade sign with Cricut | On The Creek Blog // www.onthecreekblog.com
A vintage inspired 'Fresh Cut Flowers'  sign.

I'm back with another sign!

After seeing how easy it was to create my 'Tomatoes' sign, I wanted to make another sign!

I took a slightly different approach with this sign.

I originally wanted to make another sign that looked like the 'tomatoes' sign but I didn't have any more of the old boards.

What I did have was a piece of thick pine board, so I decided to use that.  Because I wanted a square sign, I had my husband cut it down to size.

Once the board was cut, it was time to create the sign!


Thursday, June 09, 2016

,

how to make a favicon

There are some changes happening to my blog!

First up, I changed my overall blog design!

new blog design

I tried to make the design as simple as possible. I plan on adding some buttons along the sidebar where I'll showcase things like my home tour, recipes and my chalk painted pieces.

I also updated my favicon and thought I'd share a little tutorial on how to make one.

But first:

What is a favicon?

A favicon is the little icon that goes next to the url when you're viewing a web page.

Here's what mine looked like before:

favicon


Why do you need a favicon? 

You need a favicon to set your blog apart from the sea of other blogs out there. It's yet another way to personalize your space on the web. Whenever someone clicks over to your blog, they'll see your little icon next to it.

Plus, it looks really cool in Feedly:

feedly favicons


My favicon also appears in my pins on Pinterest so every time someone sees my favicon, they know it's me!

Rich Pins


I wanted to change up my icon because I got tired of the heart one I've been using. I chose a pink + sign because I thought it was cute and bold at the same time.

How to create a favicon

Creating a favicon is incredibly easy!

The size of a favicon is 16x16 pixels and must be saved as .png, .gif or .ico

To make my favicon, I actually just created a new design in PicMonkey and set it to 16x16 pixels.

PicMonkey Design

From there, I picked a font and made the +, but there are so many other things you can do. I've seen logos and pictures being used a favicons and they look awesome. Personally, I chose my favicon because my blog name is so long and I really didn't have a logo created to fit within the 16x16 space. In the future, I might change my favicon to something more personal to my brand, but I like mine right now.

Making a favicon is a simple thing you can do to further brand your blog!

Friday, February 26, 2016

,


Refinishing the floors in the loft were super easy compared to the floors in the loft bedroom. For prep, we just swept the floors with the wet/dry vacuum and mopped the floor. Once it was dry, we put on 2 coats of polyurethane, letting the floor dry in between coats. The polyurethane was just the cheap stuff but it did a fantastic job and went on super heavy. 

Here's how the loft floor looked before:


and here's what it looked like after one coat of polyurethane:


Also, we put up a new railing, which I'll cover on another post. That weird spot in the middle of the floor is where we forgot to put polyurethane on the first time! We fixed that in the second coat! #professionals


Here is the new floor and old floor together. This is before we put polyurethane on the new floor. It's not a total match, but fairly close for being done 25+ years apart!
On the Creek blog is proud to be a part of the T&J Maintenance family - turning houses into homes.